Our website has recently been updated. Some images or features may be unavailable. Please bear with us as we work to improve your experience.
February 2023 Tech Tip - Coupler Height Gauge Wedge
The weather has been keeping a lot of you indoors and getting those old modeling projects out again. I have received several product requests for things we don’t sell as retail items or special pack requests. (Example: bulk #33 couplers) Also, requests for coupler conversions for brass cars or old obscure cars that we have never seen or heard of.
Please keep in mind we don’t sell special request packages of bulk couplers or special request parts. We would have to stop current production, check availability, pull parts for a single special package, program the special package in the online system for billing, and sell it to a customer. The reality is “special request product” needs to be billed for lost production time, set up, and assembly time for a single item; the “special request product” would cost much more than purchasing multiple 2-pair packages of couplers. For “special request detail parts,” the same is true. Generally, we don’t keep spare parts for cars we have produced.
For those pulling out old obscure cars and brass cars looking for coupler conversions, there are a few brass cars in our coupler conversions, but not many. If you don’t find that old car’s coupler conversion, you must do a custom coupler mounting.
These steps are true for almost any custom coupler mounting to determine the coupler offset height. Remember, we don’t suggest using metal couplers with brass cars or metal frame cars in case of a hot chassis to help prevent an electrical short.
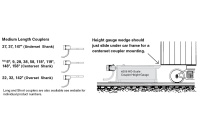
For HO-Scale, we suggest using the back of the #206 height gauge to check for starting coupler mounting height. The top of the #206 wedge pushed up to a car would be the top of a centerset coupler mounting gearbox height (Example No.5®, or #148 or #28 coupler). If the wedge just skims where you want to place the gearbox, then the centerset coupler would be the appropriate height coupler to mount a gearbox. If there is a cast-on box and the #206 wedge touches the top of the cast-on box, same can be determined that a centerset coupler should be used. Now there may be some fine-tuning that is required, but you get the point. You will have to make sure you have clearance for the gearbox style you are using and trim for clearance issues or use a smaller gearbox option.
If you have a gap to the bottom of where you want to mount the coupler using the back of the #206, the thickness of the coupler shank (.050”), then use an overset shank, thus lowering the coupler head would be what you would need to use. If the back of the #206 hits the end of the car and doesn’t slide under (once again, the thickness of the coupler shank is .050”), then use an underset shank, thus raising the coupler head would be what you would need to use. Custom body mounting couplers are not difficult; it just takes some modeling skills that everyone in the hobby should have and be comfortable with if you plan on running any old equipment. Remember, the coupler height gauge is used for more than just checking your coupler finish height. You can check your uncoupler heights to ensure they are even and level. The all-metal #205 or insulated plastic #206 coupler height gauge is your best friend for a smooth operating, trouble-free layout.
Note: all of our other scale coupler height gauges with the wedge on end; it works the same way for determining your coupler mounting height for mounting centerset couplers.


